[iPhone Compatible] A Step-by-Step Guide to Using and Purchasing Tickets on the Navigo App (Île-de-France Mobilités)
Published date:
2026-10-02
![[iPhone Compatible] A Step-by-Step Guide to Using and Purchasing Tickets on the Navigo App (Île-de-France Mobilités)](https://cdn.prod.website-files.com/679a0f0767ddc89953624c39/6abccdf0241805aeaf4c7441_Article419_IMG_8374_1200_675.webp)
Navigo is the public transport smart card system used in Paris, similar to Suica or PASMO in Japan. By using the official "Île-de-France Mobilités" app, you can purchase tickets directly on your smartphone and simply tap your device at the ticket gates. This saves you from waiting in line at ticket machines, and you can even set everything up before you leave for your trip.
In this article, we provide a step-by-step guide for visitors to Paris, using actual screenshots to show you how to install the Navigo app, buy airport and metro tickets, and use your phone at the gates.
*The information in this article is current as of September 2026. Please check the official website for the latest updates.
Navigo is a transit smart card system for Paris. Much like Suica or PASMO in Japan, it can be used on public transport throughout the Île-de-France region, which includes Paris. For short-term travel or business trips, there are two convenient ways to use it:
This article focuses on how to purchase tickets and use your iPhone at the ticket gates via the "Île-de-France Mobilités" app. Information on how to purchase a Navigo Easy card can be found in the "Frequently Asked Questions" section at the end of this article.
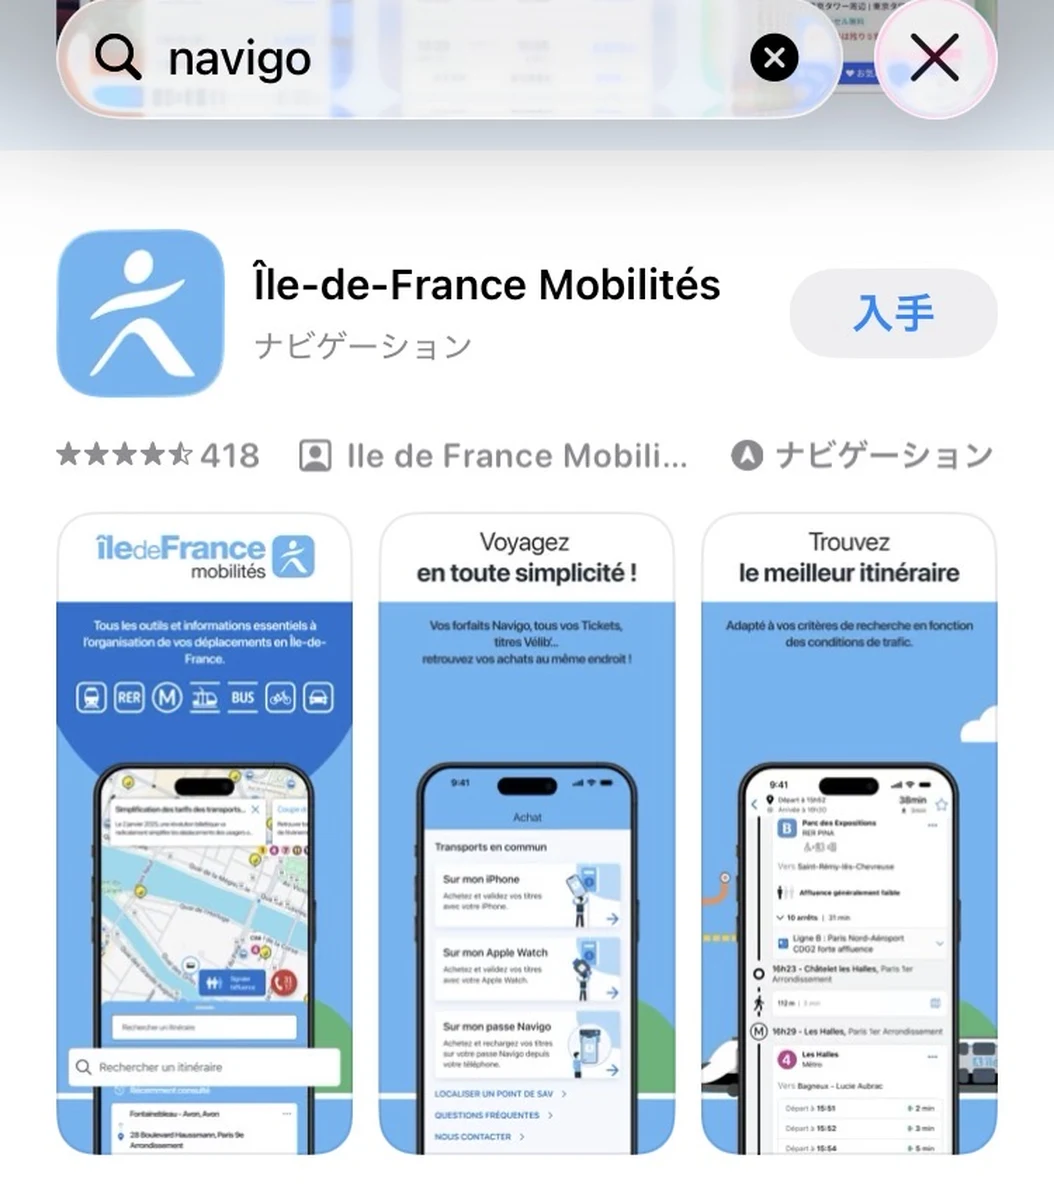
Search for "Navigo" or the official name "Île-de-France Mobilités" in the App Store for iPhone or Google Play for Android, and install the app.
Please note that this app is not available in Japanese.
If you install the app from outside of France, the default language will be English.
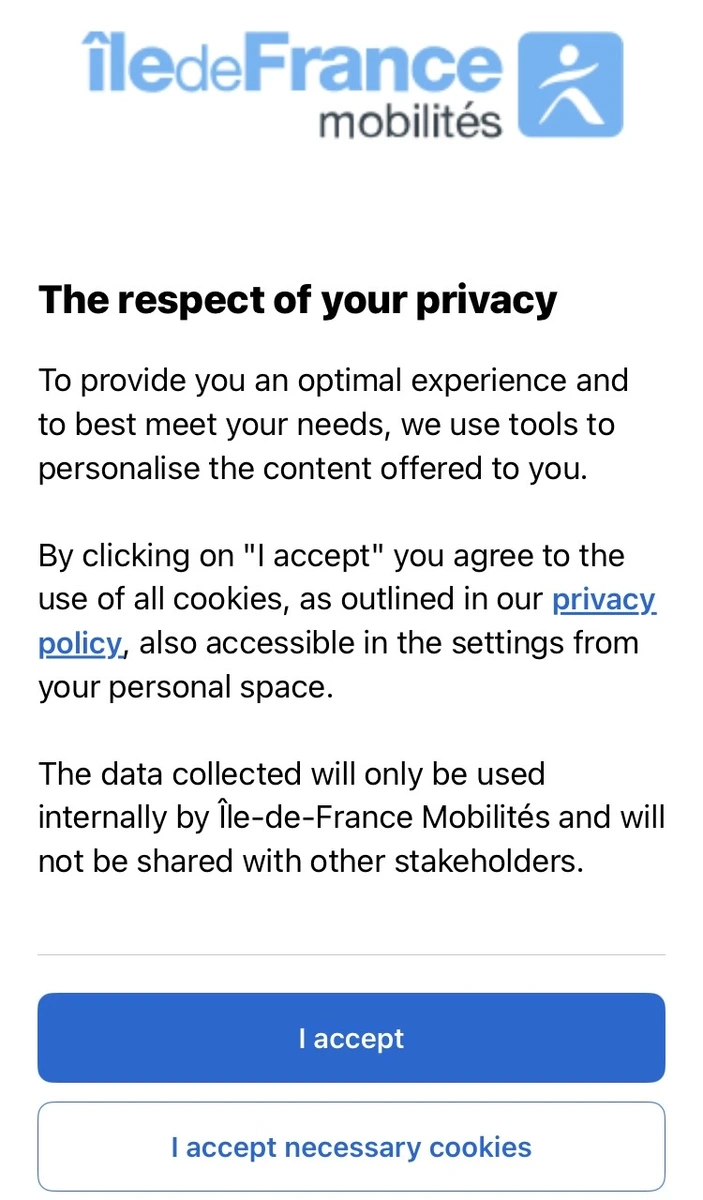
When you open the app for the first time, you will see a privacy policy (cookie) consent screen.
You can proceed by tapping the blue "I accept" button at the top.
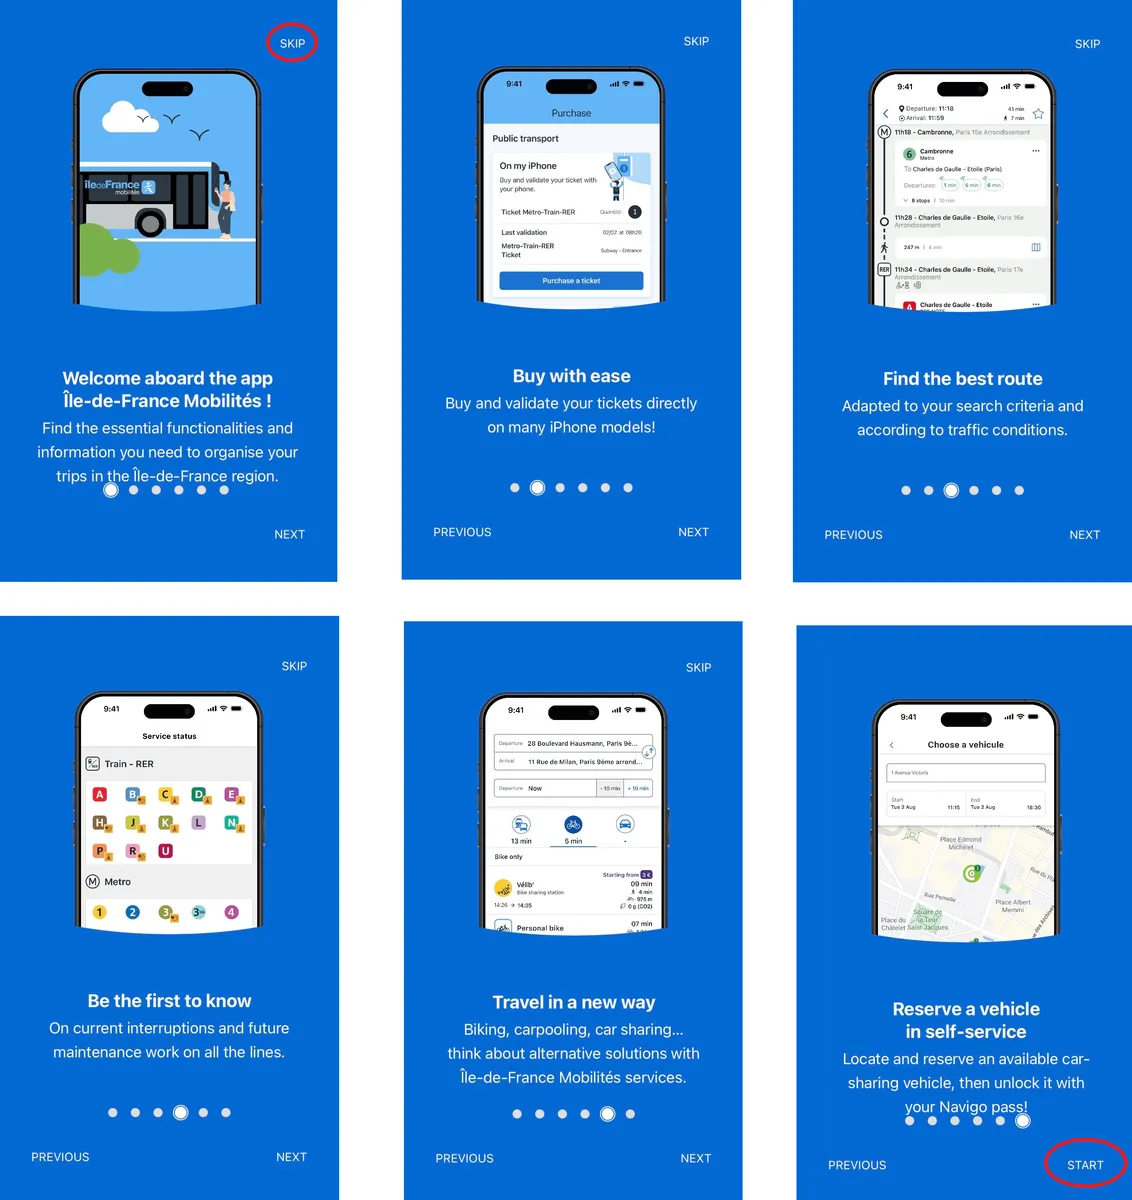
Next, you will see the tutorial screens.
You can go through them one by one by tapping "NEXT," or tap "SKIP" in the top right corner to bypass the tutorial and go straight to the main screen.
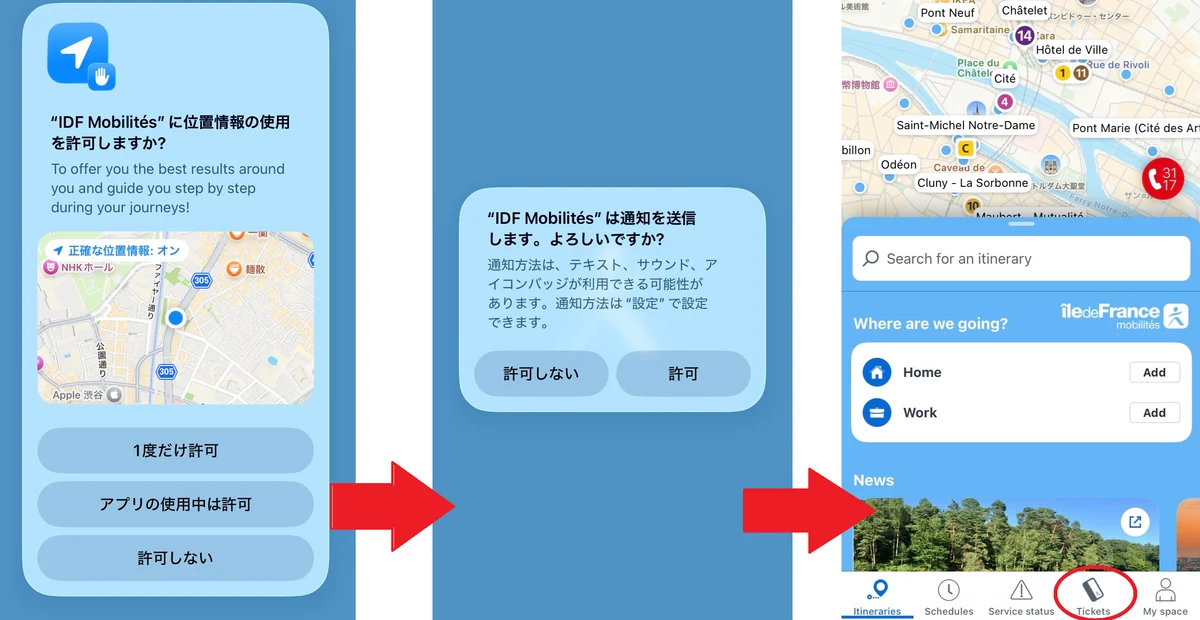
Once you select your preferences for location and notification permissions, you will arrive at the main screen (the app home).
To proceed to the ticket purchase screen, tap "Tickets" in the menu at the bottom of the screen.
Another feature introduction (tutorial) will appear; you can tap through from "NEXT STEP" to "START," or tap "IGNORE PRESENTATION" in the top right corner to skip it.
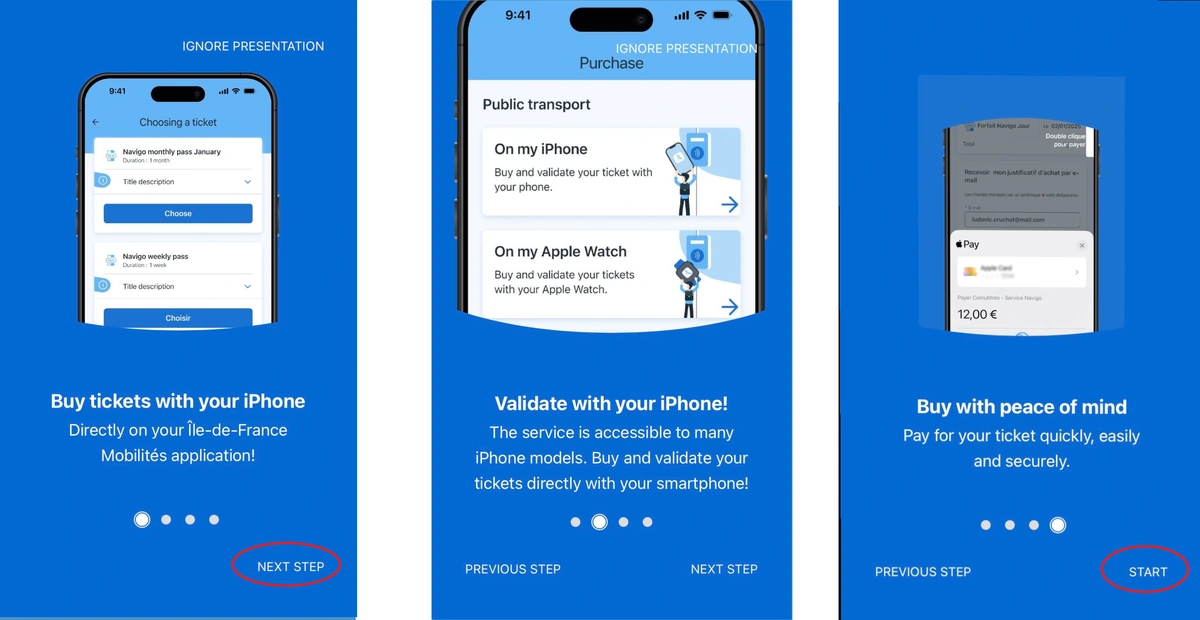
This is the "Purchase" screen.
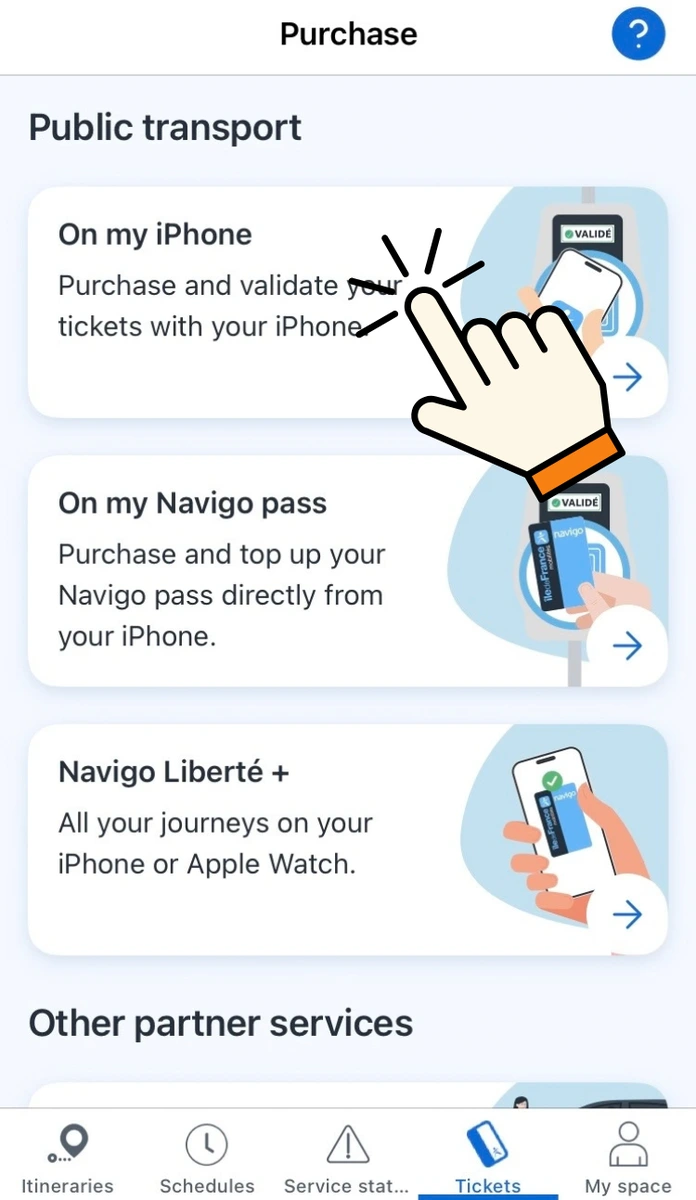
The top option,"On my iPhone"is the menu for adding tickets or passes (such as single-ride tickets or 1-day unlimited passes) directly to your smartphone so you can tap your phone at the ticket gate.
This is the easiest method and is recommended for short-term visitors.
The middle option, "On my Navigo pass," is for topping up a physical Navigo card you already own by holding it against the back of your phone. Use this if you bought a card locally and want to add more credit to it later using your phone.
"On my iPhone" Selecting this will take you to a screen where you can choose whether you already have a ticket or would like to purchase a new one.
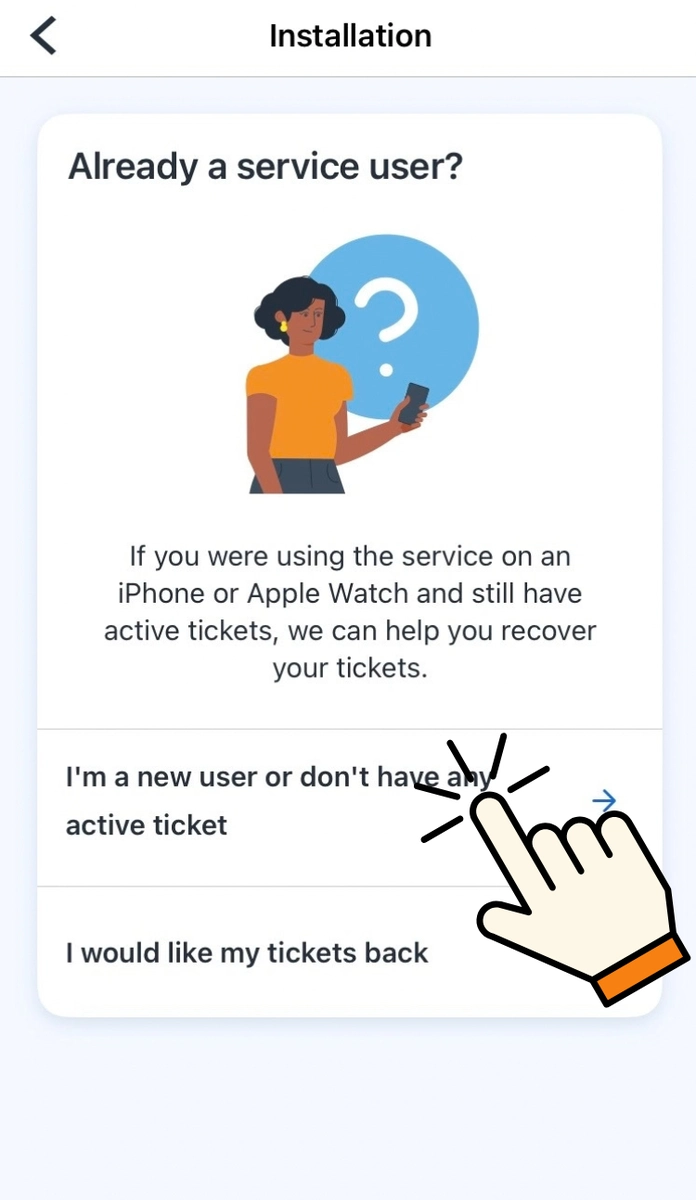
What the two options mean
If this is your first time, select the top option.
The "Choose a product" screen that appears next is where you select the type of ticket or pass you need.
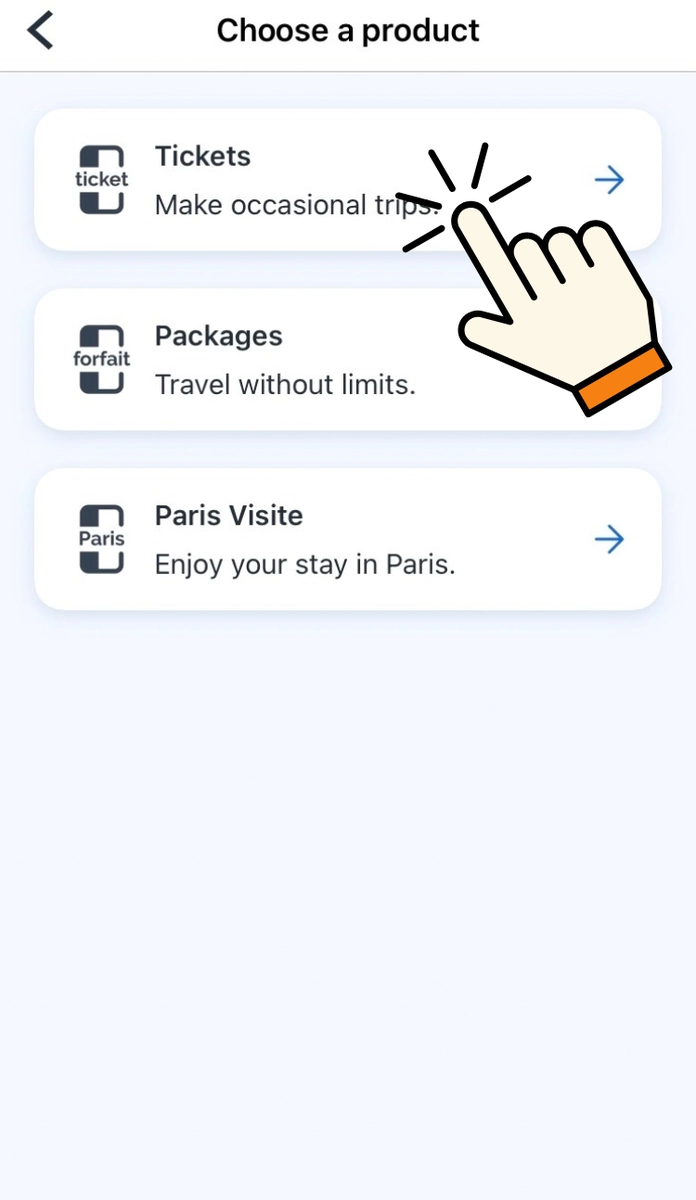
Tickets (top option): This menu is for purchasing individual one-way tickets for the Metro, RER (suburban trains), or buses as needed.
Best for: Those who only need to travel a few times, such as commuting between the venue and their accommodation.
Packages (middle option): This menu is for unlimited travel passes valid for a set period, such as the "Navigo Weekly pass" or "Navigo Monthly pass."
Best for: Those attending for a full week or planning to travel around frequently. Since the weekly pass is valid from Monday to Sunday, it is ideal if your stay aligns with this schedule.
Paris Visite (bottom option): An unlimited travel pass for tourists valid for 1 to 5 days, which also includes discounts for major tourist attractions.
Best for: Those planning a lot of sightseeing, as it includes discounts for tourist attractions.
If you are visiting for an exhibition or similar event, we generally recommend the top option:"Tickets".
If your stay is from "Thursday to the following Wednesday,"Itineraries spanning across weeksIf your trip spans across weeks, a 1-week pass (Monday to Sunday) will expire on Sunday. Therefore, if you aren't traveling very frequently or your schedule crosses over into a new week, it is more cost-effective to combine individual tickets.
Selecting "Tickets" will take you to a screen where you can choose specific ticket types.
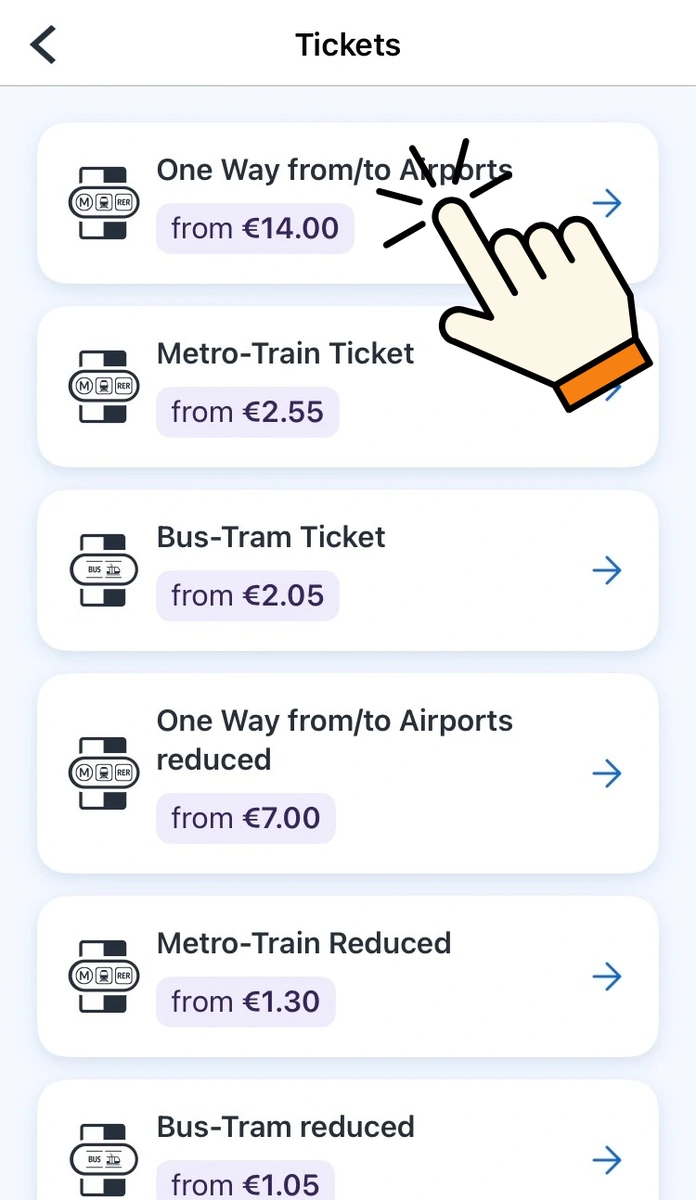
When staying for events or exhibitions,most people frequently purchase the top option (One Way from/to Airports) and the second option (Metro-Train Ticket).
However, since these two tickets cannot be stored on the same smartphone simultaneously, you need to be careful about the order in which you purchase them (details are explained in "How to buy Metro-Train Tickets").
The meaning and usage of each item are as follows:
One Way from/to Airports (top option)
Metro-Train Ticket (second option)
Bus-Tram Ticket (third from the top)
Bottom half (Reduced section)
First, let's look at how to buy the "One Way from/to Airports" ticket at the top of the list.
The "Good to know" section contains important notes.
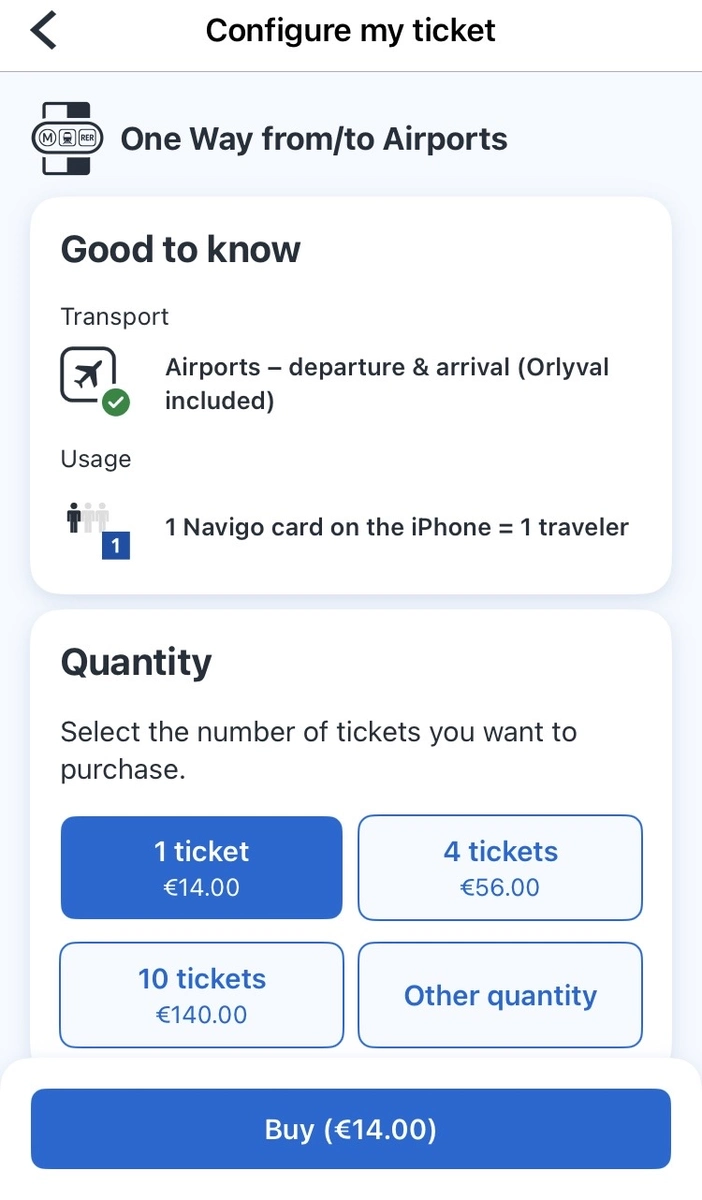
It states the important rule: "1 Navigo card on the iPhone = 1 traveler." In other words,You cannot use one smartphone to hold tickets for multiple people to pass through the ticket gate.Therefore, your companions must install the app on their own smartphones and purchase their tickets individually.
"Quantity" is where you select the number of tickets.
Select "1 ticket (€14.00)" and tap the "Buy (€14.00)" button below. If you have an airport ticket remaining on your phone, you may be unable to purchase metro tickets, so do not buy your return ticket in advance; purchase it just before you head back.
Tapping "Buy" will take you to the login screen.
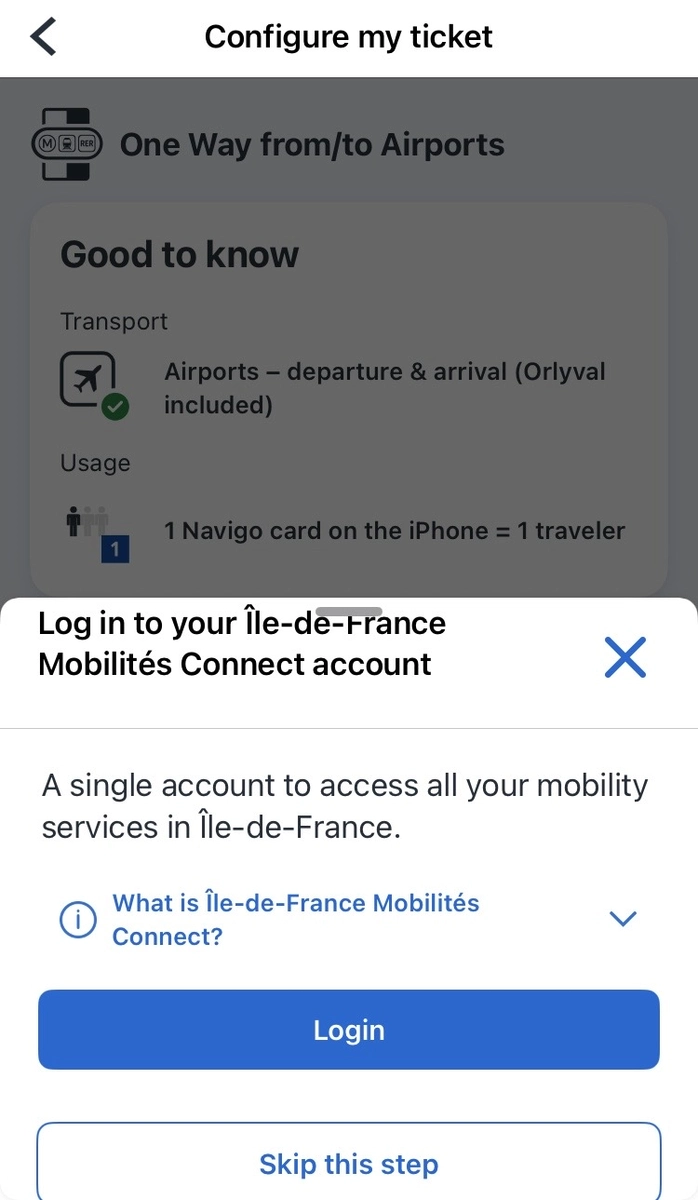
"Login" button: Select this to create an account or log in.
"Skip this step" button: You can also proceed to purchase without creating an account.
Benefits of creating an account
You can create an account by registering your email address and a password.
If you just want to buy a ticket once right now, "Skip this step" is fine to use. Here, we will explain the steps for creating an account.
Tapping "Login" will take you to the login and account creation screen.
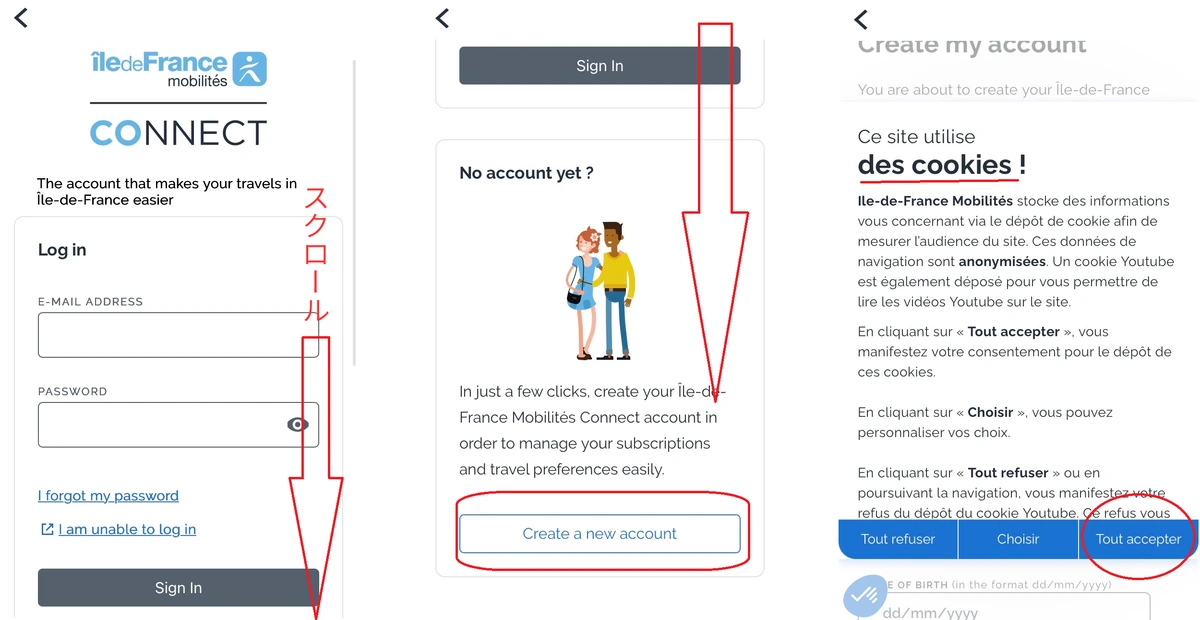
If you are a first-time user, scroll down to the middle of the page and look under "No account yet?" for"Create a new account"and tap it.
If a screen appears with "des cookies !" written in French, that is the cookie consent screen. Tap "Tout accepter" (Accept all) at the bottom right to proceed.
Next, enter your personal information.
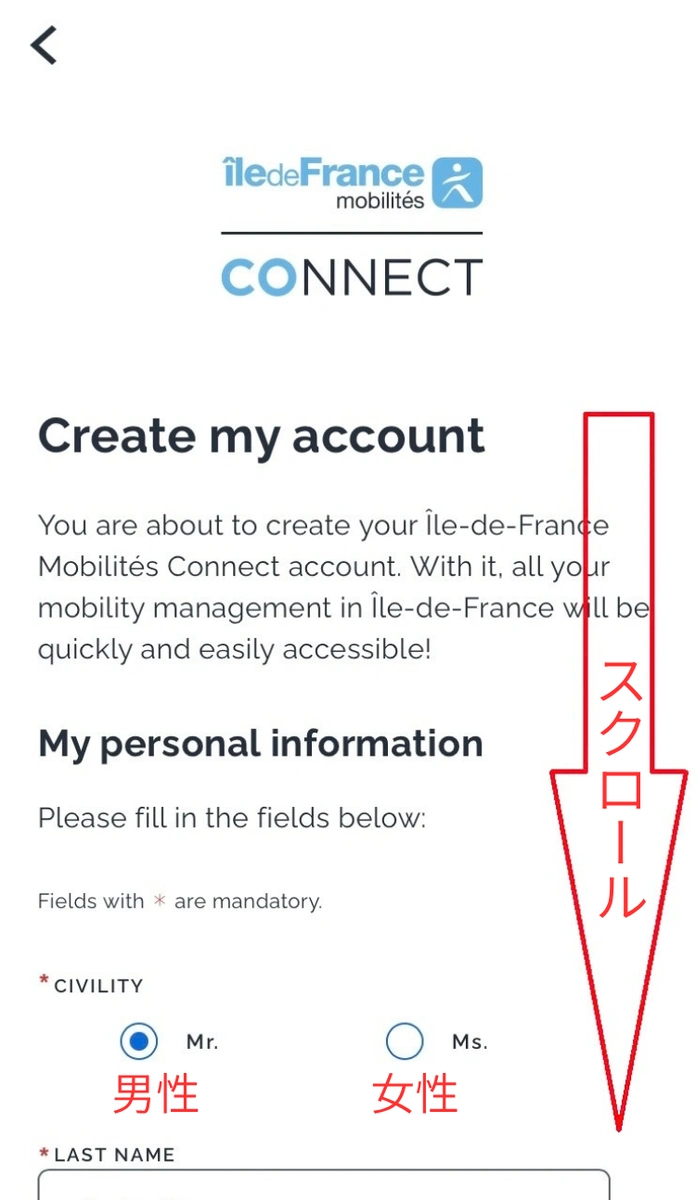
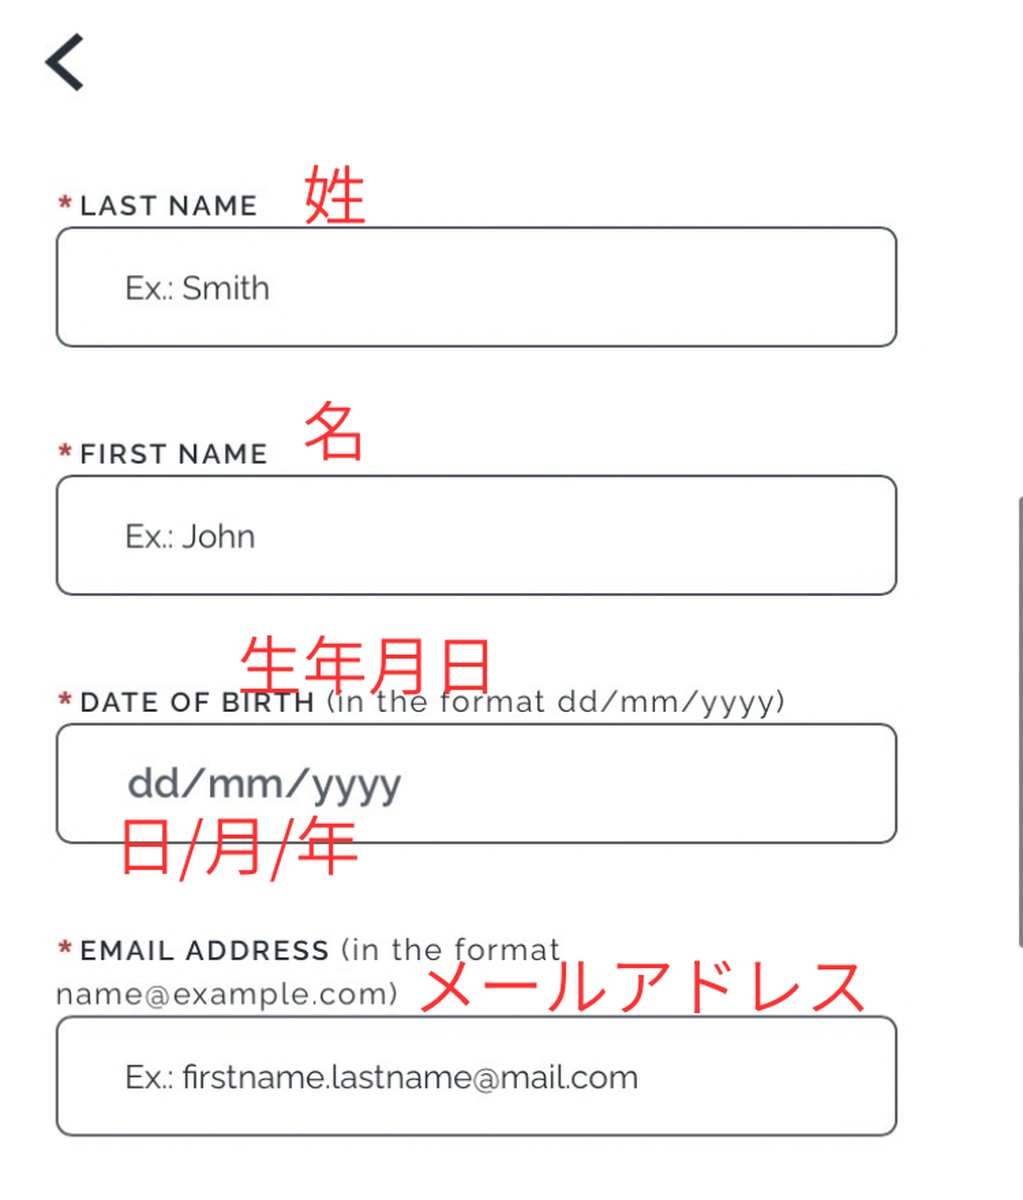
Fields marked with an asterisk (*) are required.
Please note that the date of birth must be entered in "Day/Month/Year" format, which is the reverse of the standard Japanese format.
Next, enter your phone number for identity verification. This number is used solely for verification purposes and will not be linked to your account.
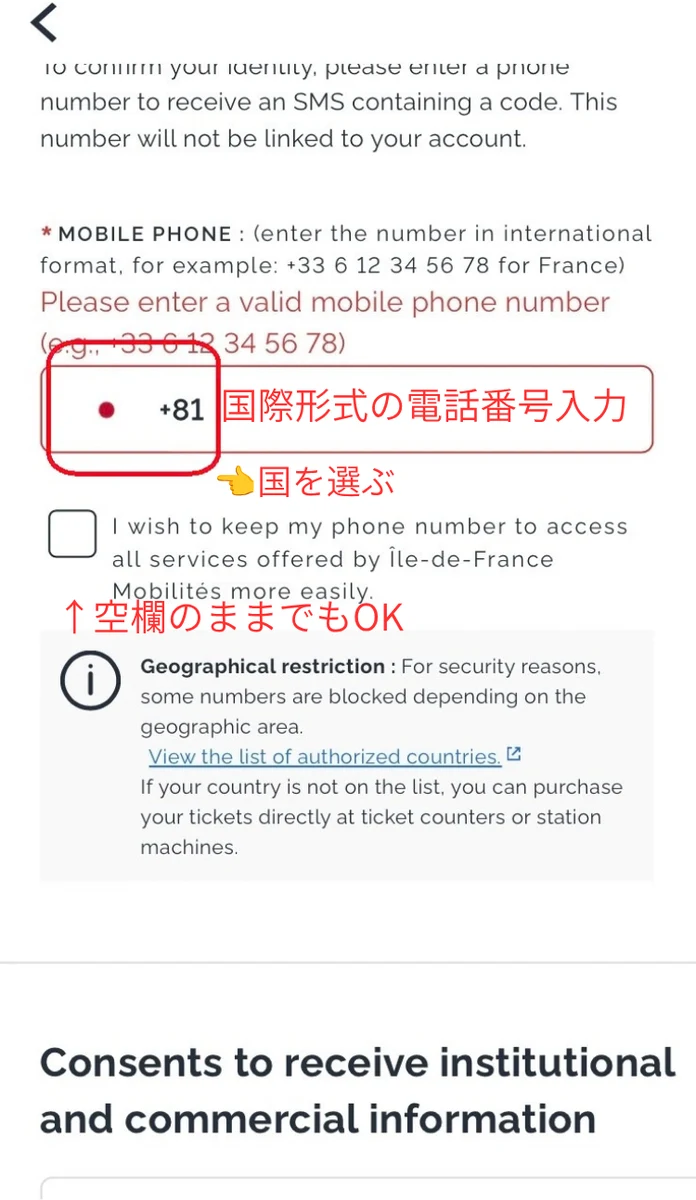
Tap the flag icon on the left side of the input field and select Japan (+81).
When entering your number, omit the leading "0".
Example: For 090-1234-5678, enter "9012345678" after "+81".
The option "I wish to keep my phone number..." below the number field means "Save my phone number to make using the service easier in the future." You can proceed with registration without checking this box.
The "Geographical restriction" note below that explains that, for security reasons, phone verification may not be available in certain countries. If verification fails, you can still purchase airport or metro tickets without an account by selecting "Skip this step" on the previous screen.
This screen is for configuring your email notification preferences.
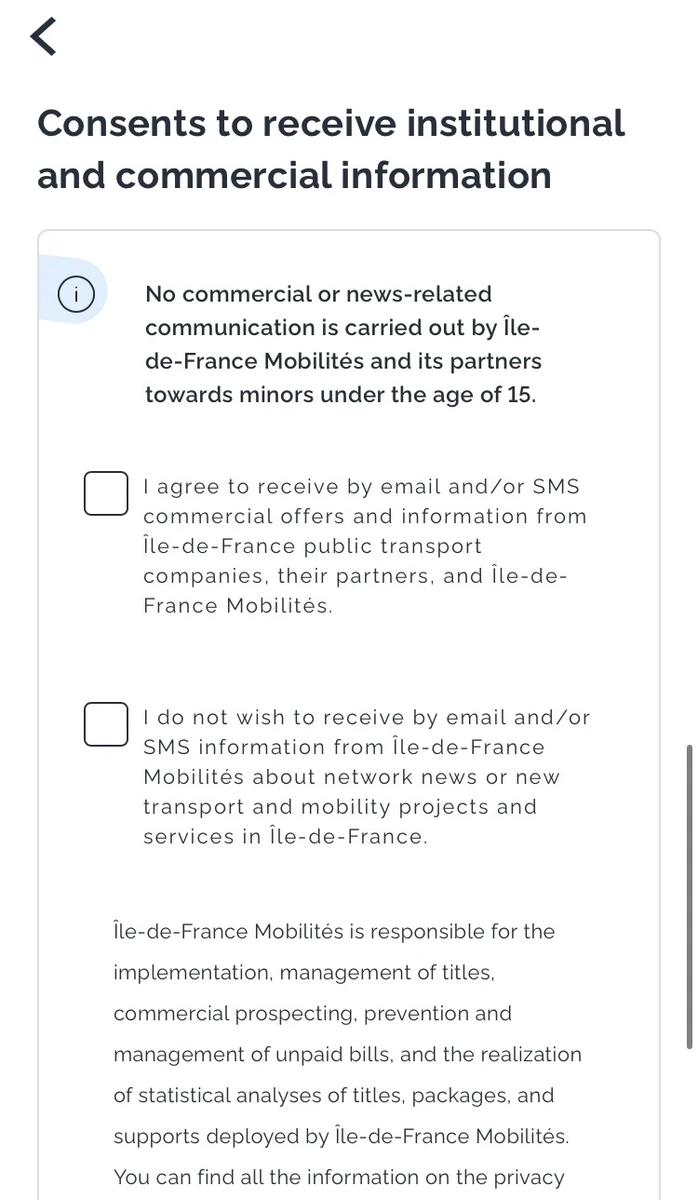
The top checkbox (I agree to receive...) means "I agree to receive promotional and campaign information from transport companies and their partners."
The bottom checkbox (I do not wish to receive...) means "I do not wish to receive service updates or information about new features."
Neither is required for registration, so you can leave them blank and proceed. (If you do not wish to receive any notification emails, check only the bottom box.)
Once you have finished entering your information, tap "Next" at the bottom.
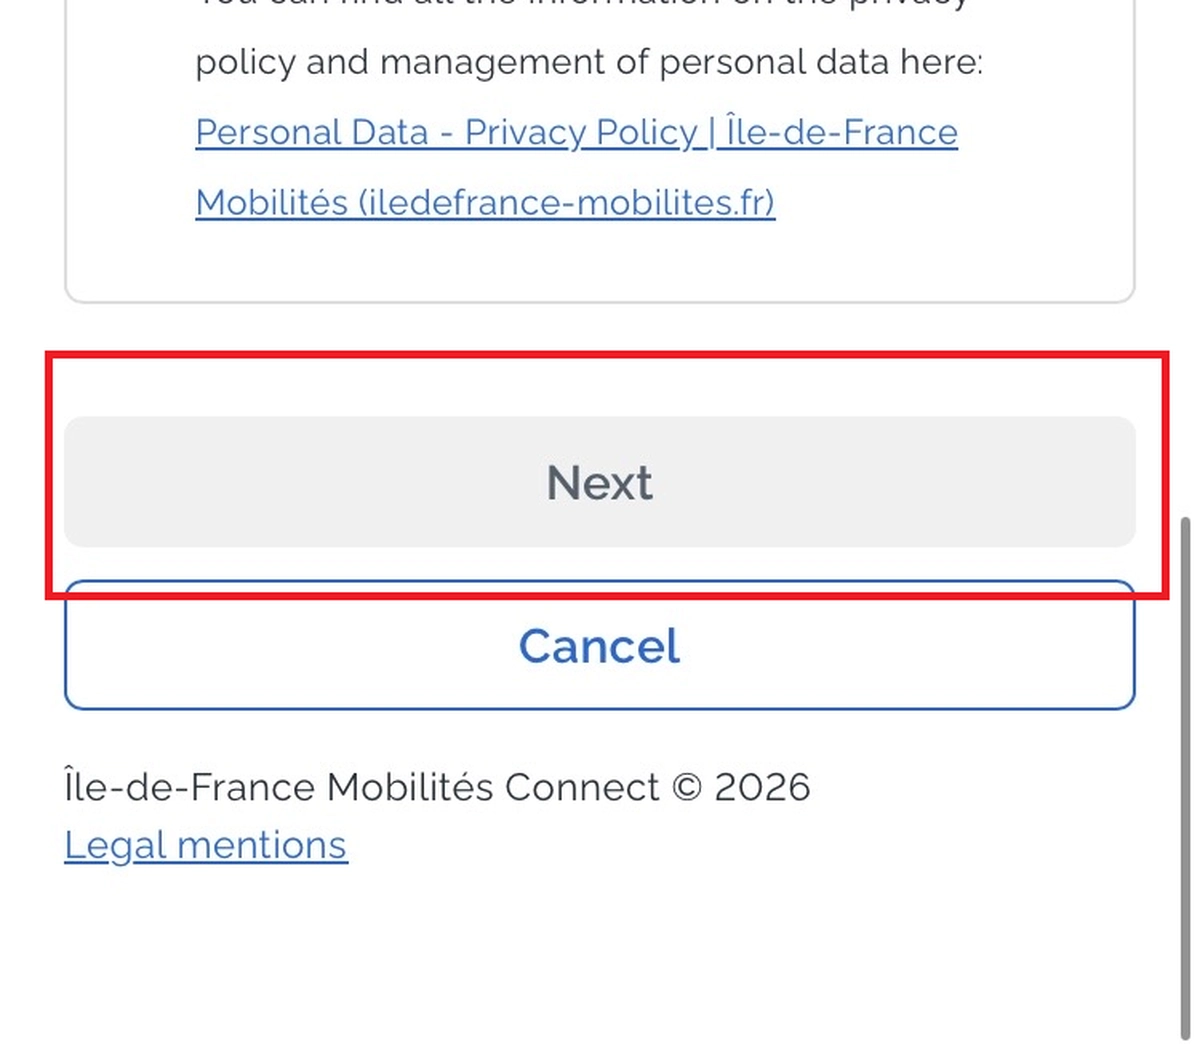
A verification code will be sent to the phone number you provided via SMS.
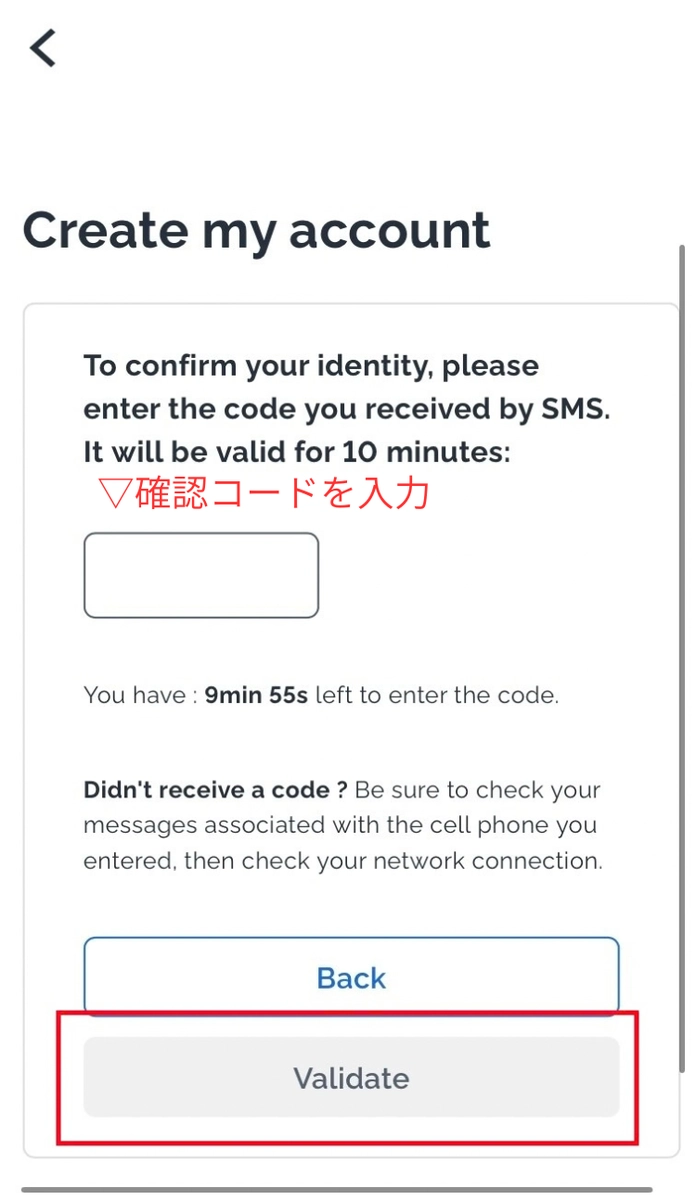
Enter the code you received into the input field and tap "Validate." The code is valid for 10 minutes.
"Your Île-de-France Mobilités Connect account has been created.You will see an "Account created" screen, and a confirmation email will be sent to the address you registered. Open the email and tap the blue "Activate my account" button.
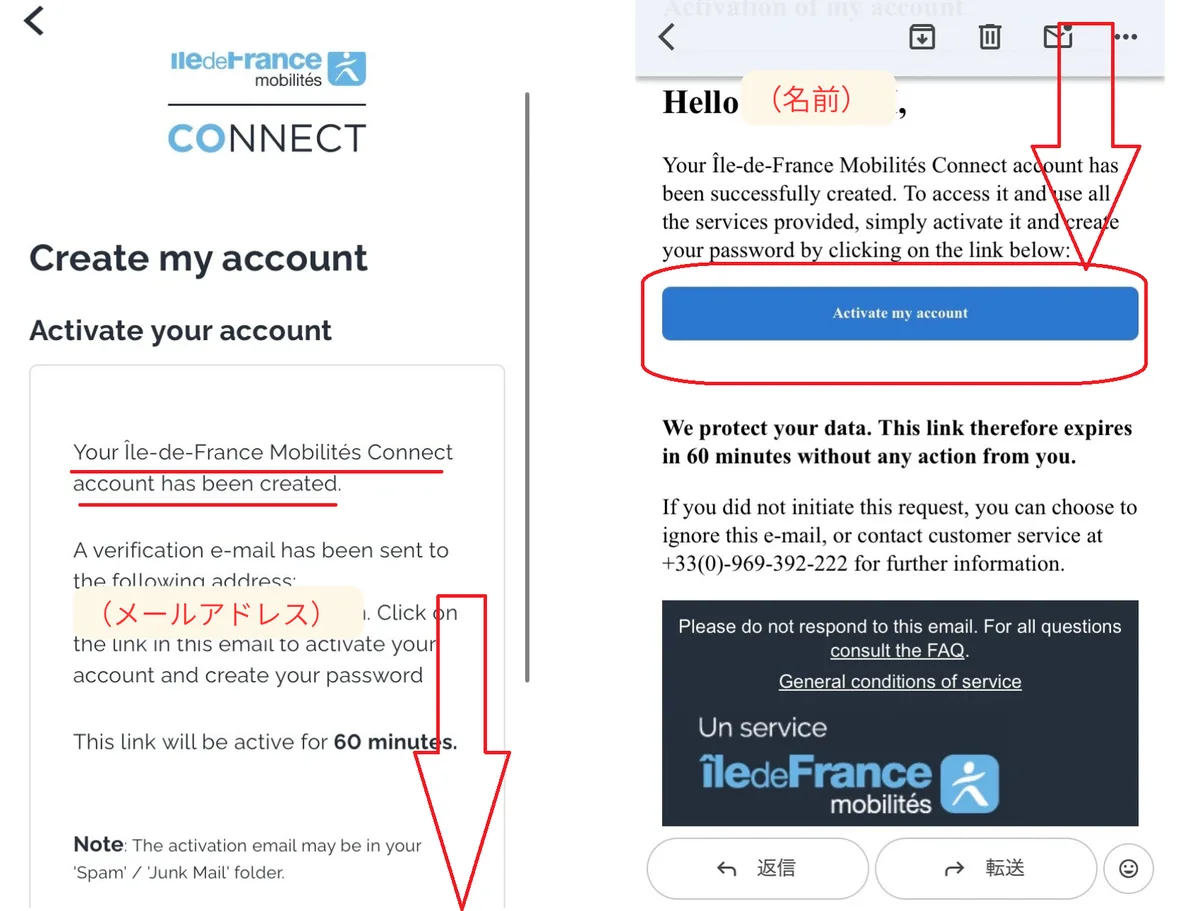
The link in the email expires in 60 minutes, so please open it promptly. If you cannot find the email, please check your spam folder.
Your browser will open to the Terms of Service screen. Please note that the terms are written in French.
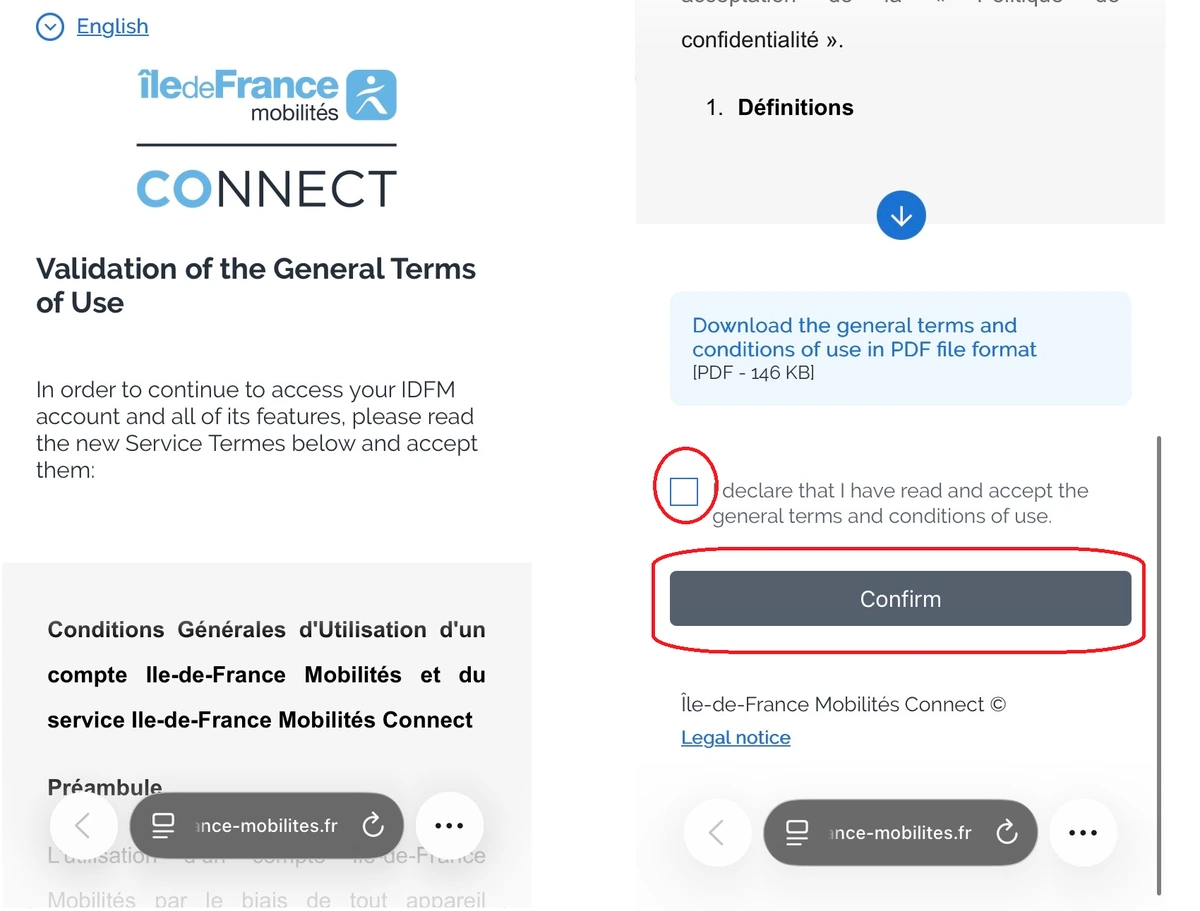
Scroll to the bottom, check the box next to "I declare that I have read and accept the general terms and conditions of use," and tap "Confirm."
Once you see the message "Your e-mail address has been successfully verified," you can create your password.
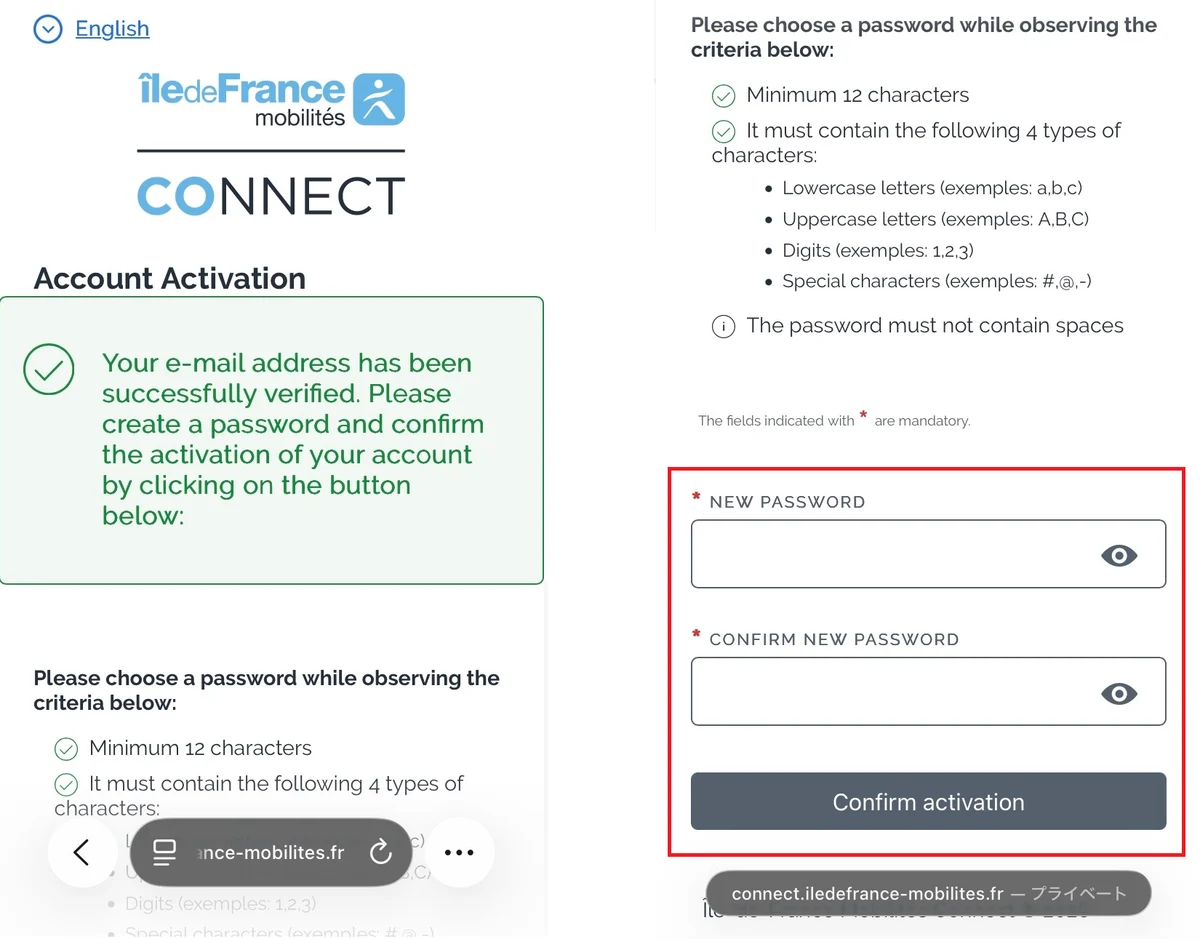
Your password must be at least 12 characters long and include all four of the following types:
Spaces cannot be used.
Enter the same password in both the "NEW PASSWORD" and "CONFIRM NEW PASSWORD" fields, then tap "Confirm activation."
When "Your password has been updated successfully" appears, your account creation is complete.
Do not tap "Log in" on this screen; simply close your browser and return to the app.
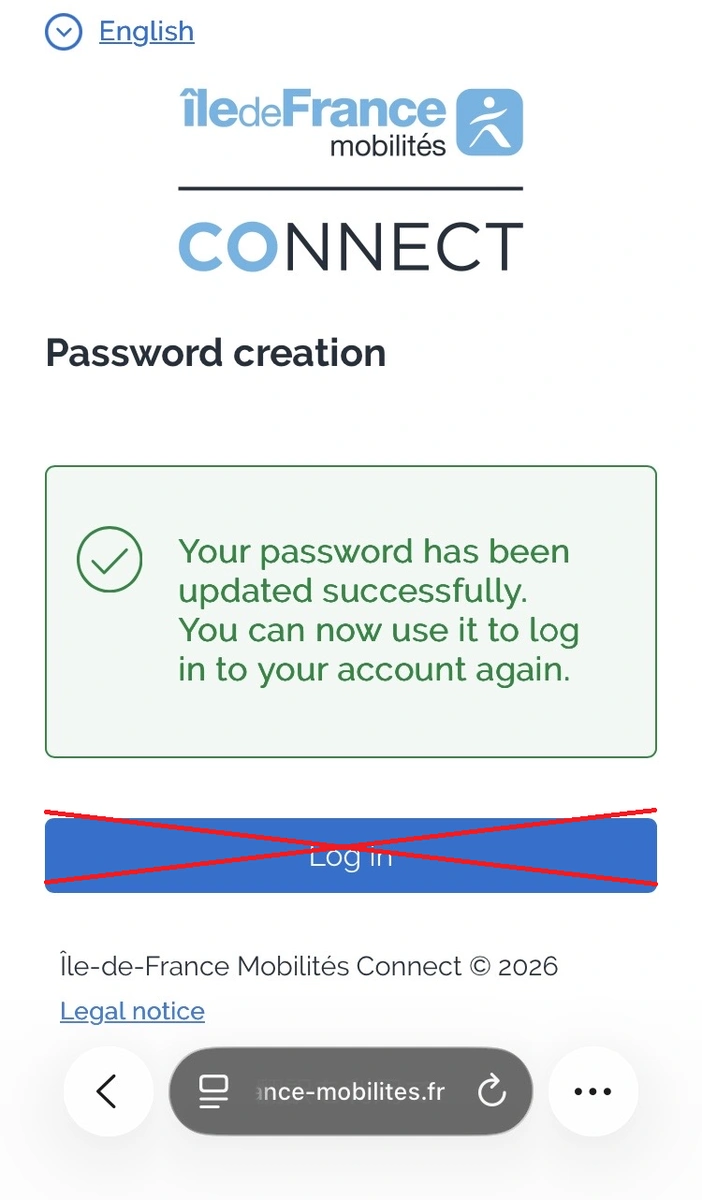
Return to the app, enter your registered email address and password on the login screen, and tap "Sign In."
Once logged in, you will return to the ticket configuration screen (Configure my ticket). Confirm the number of tickets and tap "Buy."
On the purchase screen (Purchase my ticket), you will see the email address where your purchase receipt will be sent.
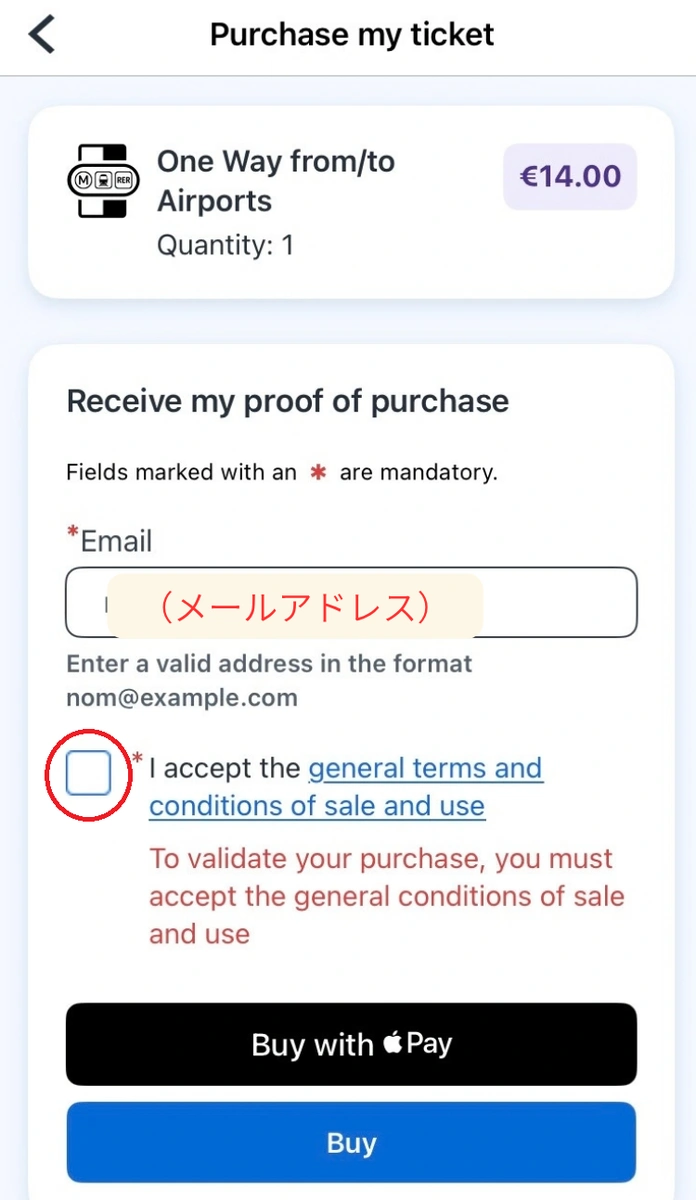
Check the box for "I accept the general terms and conditions of sale and use," then tap "Buy with Apple Pay" or "Buy" to proceed with your payment.
You can purchase Metro-Train Tickets using the same process. If you are already logged in, you won't need to create an account or sign in again.
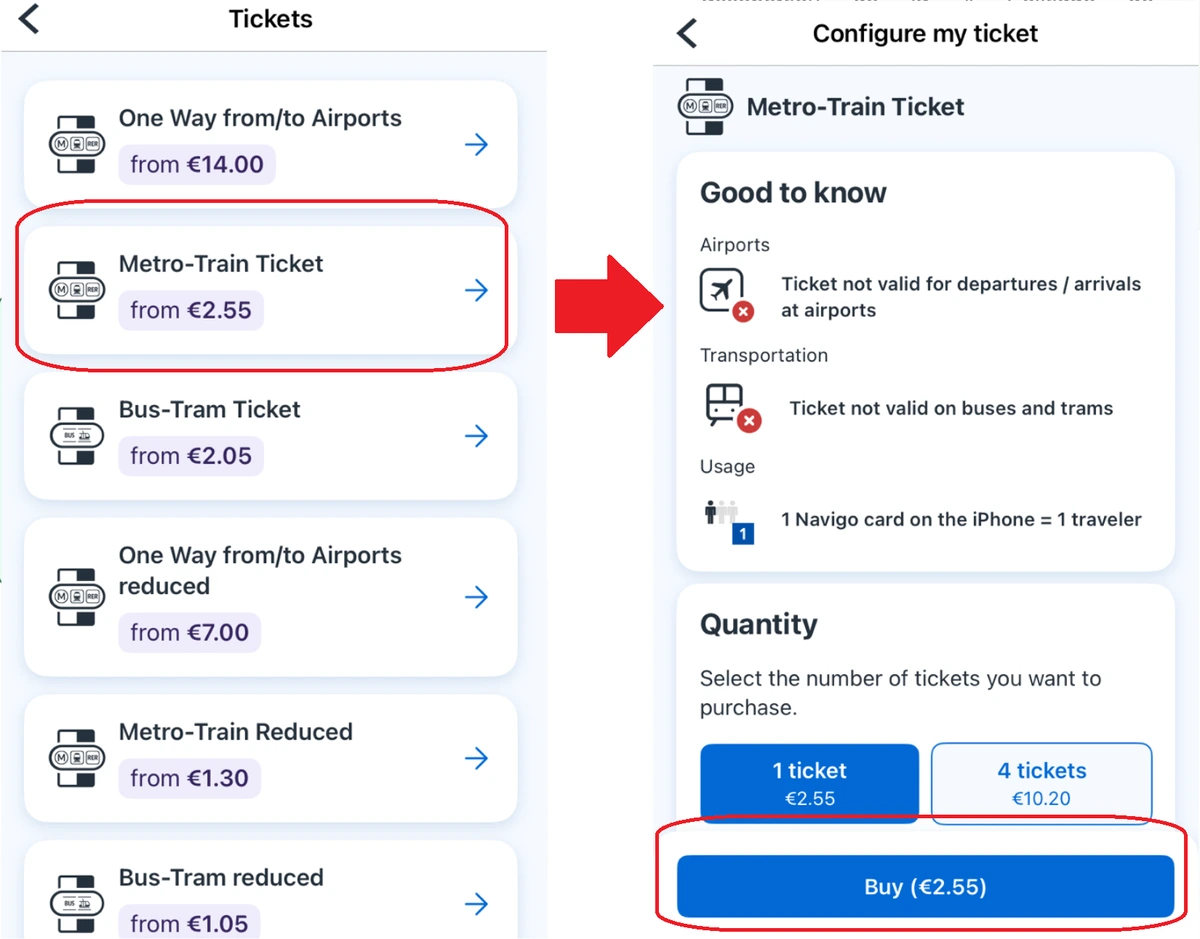
Select "Metro-Train Ticket," the second option in the "Tickets" list. The "Good to know" section notes that this ticket cannot be used at airport stations (for arrival or departure) or on buses and trams. Select the number of tickets you need and tap "Buy."
As long as an airport ticket remains on your phone (until you pass through the exit gate with the ticket you used to enter), the metro ticket will not appear on the purchase screen, and you will be unable to buy one. Conversely, you cannot buy an airport ticket while a metro ticket is still on your phone.
To ensure a smooth experience, we recommend purchasing them in the following order:
If you absolutely need to have both at the same time, you can purchase a plastic "Navigo Easy" card (€2) at a station and use it to store one of the tickets, allowing you to use both your phone and the card.
At the ticket gate, hold your smartphone over the reader on the gate (for iPhone, hold the top part of the device over the reader).
On an iPhone, purchased tickets are stored on the "Navigo" card in your Wallet app. When you make your first purchase, a screen will appear to add the Navigo card to your Wallet; follow the on-screen instructions to complete the process.
If you enable "Express Mode" for your Navigo card in the Wallet app, you can pass through ticket gates just by holding your phone over the reader, without needing to unlock your screen or open the app.
Some locations, such as certain RER stations, buses, trams, or stations under construction, may not have ticket gates. However, you must always hold your phone over the reader before boarding to record that you have used your ticket. If you board without doing so, you may be subject to a fine, even if you have a valid ticket.
Q. Can I create an account using a Japanese phone number?
A. Yes, you can.
As of September 2026, you can create an account by receiving an SMS verification code on a Japanese mobile number (+81). However, please note that verification may not be available in some countries. If you encounter any issues, you can still purchase airport and metro tickets without an account.
Q. Can I buy tickets for my travel companions on my smartphone?
A. No, each smartphone can only hold tickets for one person.
Your travel companions will need to download the app and purchase their own tickets on their respective smartphones.
Q. Can I buy both airport and metro tickets at the same time?
A. No, you cannot have both types of tickets on the same smartphone simultaneously.
Please use your airport ticket first, then purchase your metro ticket. Before heading back, ensure you have used up your metro tickets before purchasing your return airport ticket.
Q. Can I use this on an Android phone?
A. Yes, you can use the same "Île-de-France Mobilités" app on Android via Google Play.
Please note that the interface and navigation may differ slightly from the iPhone version shown in this article. The basic process, such as selecting tickets and creating an account, remains the same, so you can follow the on-screen instructions while using this article as a guide.
Q. How do I purchase the physical "Navigo Easy" card instead of using the app?
A. You can find instructions on how to purchase the card version in this video.
With the Navigo app, you can purchase all the tickets you need for getting around Paris directly on your smartphone and use them to pass through the ticket gates.
Get your travel arrangements sorted in advance so you can focus entirely on your exhibition during the event.
Japan Expo ParisIf you are considering exhibiting at overseas trade shows like this, please feel free to contact Japan Promotion. We provide support from exhibition preparation all the way through to on-site assistance.






![[Case Study] How saying "We exhibit at Japan Expo" opened doors for international business negotiations | Fuji Merchandise](https://cdn.prod.website-files.com/679a0f0767ddc89953624c39/6aa36cc9084a256532a3ed1e_Article418__DSC2778_1200_675.webp)
![Japan Expo Paris [Corporate Exhibitor] Success Stories 2026](https://cdn.prod.website-files.com/679a0f0767ddc89953624c39/6a865ca727ba3168f7ace9a4_main1200_675_article413_DSC1221.webp)